
Pass the needle and thread beneath both strands of leather cord again, and use your finger to push the bead up between the cords. Buttons: I love buttons. You need a lot of cord because it runs along each side of the beads. Cut a new length of thread, and tie it onto the leather cord just like you did for the first thread. If you liked this project, check out the rest of my intro Jewelry Class! Learn more Wrap bracelets are fun and chic, and if you can make your own, all the better!  I have no monetary interest in it, but I hope you'll have as much fun there as I do. When I first saw Chan Luu wrap bracelets, I was pretty excited. This project uses round blue beads made from Amazonite stone, but you're welcome to use beads in the material of your choice, whether it's stone, crystal, or something else entirely, like seed pods and (non-endangered) coral pictured above. Thank you for following along, and if you do make your own, please share a photo of your creation in the comments below, and let us know what kind of beads you used. Nylon thread Pass the needle back through the bead on top of both leather cords. Continue adding beads until the bracelet reaches your desired length.
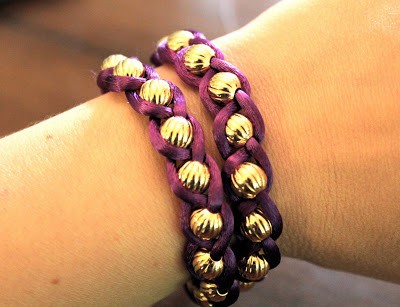
  I am also searching for knotted leather bracelet instructions! The cord should come out the bottom of the button when you're finished. Hi JeanB77,Thanks so much for your kind words. Use your side cutters to cut a strand of bead thread that is at least two arm spans long. Have enough if you plan to have a multi-wrap bracelet. =), About: Making and sharing are my two biggest passions! Buttonjones.com. Slide the first bead a little closer to the clip on the clipboard. Adjust until the button is centered on the cord. bracelet diy wrap helloglow necklace looks Make a decorative component using the eyepin and spacer bead using your pliers and wire cutters. I needed roughly 2 yards. Periodically straighten things out. They may look difficult to make, but after a few attempts, they are honestly easy to make. As an Amazon Associate I earn from qualifying purchases you make using my affiliate links. This image is not<\/b> licensed under the Creative Commons license applied to text content and some other images posted to the wikiHow website. She will love! Lots of leather bracelets are made deliberately with two or more buttonholes to start with, so people have more flexibility in the size.For a bracelet that needs an extra inch, adding another button holeis really a great solution. I have read different things while trying to get a single answer. This page may contain affiliate links. You have time to get it in the right place, and wash it off your fingers. Artsy Craftsy gene bypassed my daughter and went to my granddaughter ! Or is it a problem with my stitching? You're essentially creating a figure-eight pattern with your needle around the two leather cords, capturing a bead in the process. wikiHow, Inc. is the copyright holder of this image under U.S. and international copyright laws. Hope you get this!!! I usually ask the person who will be wearing it, which they'd prefer, real leather or faux? hair friendship embroidery wrap wraps thread bracelet bracelets diy floss patterns designs yarn council warm craft welcome I have one I bought and wondered how it was made! And with that, finito! That will give you an approximate cord length you will need to start your bracelet. knots floss buckling nasture multemargele Close the ring and slide it up to the top of the thread this will make a bail for your tassel and you can use this to attach it to a decorative component in the next step. Peace ! Tie a knot by making a loop with the thread exiting the bead you just went through and passing the needle through that loop. Pull slowly to avoid tangles, and make sure both strands of your double strand of thread pull down snugly against the leather cord. When you visit this site, it may store or retrieve information on your browser, mostly in the form of cookies. How to straighten leather cords: While you are stringing on beads, adjust previous beads with fingers to straighten out leather cords. ), Reply Also, I too love ButtonJones. If you want it to wrap around more times, crochet it to that length. Here are some of our inspired wrap bracelets. It may seem like a lot of beading, but it goes pretty quick. bracelet leather tutorial bracelets jewelry diy wrap wire tutorials beaded beading wrapping wrapped beads silk way technique thread bijoux cord Thanks for the tutorial, I am now confident to create my own version of wrap bracelet. I can't think of any off the top of my head, but it would certainly be much more pleasant to just use hand lotion and then rub the cord versus getting whatever goes into the conditioners on my hands. Multiply that by the number of wraps you want and then add 12. Tighten leather knots: If your leather cord knots are loosening, add a small dab of fast-drying glue or Hypo-Cement to knot(s) for tighter holds. Pass the needle beneath both strands of leather cord, and use your finger to push the bead up between them. If your beads came on a string, free them into a small container nearby. Now comes the fun part. Leather cord (or any sturdy, thin cord): First figure out how many wraps you want to make. plastic bracelets wrap weaving bracelet kollabora multicolor ago years project I tried and it was everywhere, knotting up, getting stepped on and rolled over, it was just out of control. Now it is time to start beading. You can also use a clipboard to secure the cord, or a piece of scrap wood and a nail. Now I can wear it at several different lengths.
  Plan to stop with one of the fire-polished beads when you only have 8 inches of thread left. This image may not be used by other entities without the express written consent of wikiHow, Inc.
\n<\/p>
\n<\/p><\/div>"}, http://blog.consumercrafts.com/jewelry-main/beaded-diy-wrap-bracelet/, https://www.graceandgoodeats.com/leather-beaded-wrap-bracelet/, https://www.youtube.com/watch?v=AY9gm_Ogvcs&feature=youtu.be&t=179, https://www.youtube.com/watch?v=AY9gm_Ogvcs&feature=youtu.be&t=202, https://www.youtube.com/watch?v=9yb2QHa9bck&feature=youtu.be&t=12, https://www.craftyarncouncil.com/mar06_crochet.html, https://www.1dogwoof.com/crochet-wrap-bracelet-button/, https://www.shinyhappyworld.com/2012/12/options-for-single-crocheting-in-a-chain.html, https://www.dreamalittlebigger.com/post/slip-stitch-crochet.html, http://www.cremedelacraft.com/2013/03/Leather-Studded-Wrap-Bracelet.html. Get DIY project ideas and easy-to-follow crafts to help you spruce up your space. Use a small square of cardboard to help you make a tassel. At the midpoint, tie an overhand knot to create a small loop and two tails. Use a piece of tape to hold down the thread tails. You can cut off any ends that show from the first button hole, but carefully glue where you cut them so they won't come undone. If you're looking for a short and sweet project, try a studded leather wrap bracelet made with brass studs used for paper. Hi Jaclen and thank you for this awesome comment! These are really cool! Hi owenswise,Just saw this, so sorry it's so late! The colors, shapes, and sizes are all matters of personal taste. We use cookies to make wikiHow great.  Reply It is going to save me so much money!! Cut a piece of leather cord about 30 inches (75cm), and fold it in half. However, if you don't want to make this part, cut the cord off just below the second knot you made with both ends of the cord. Trim the tail of the beading cord only. Finally, use a thread burner to trim both strands of thread close to where they exit the bead, and remove the excess thread that's knotted around the leather cord. You can clean up the loose nylon thread end once the bracelet is almost finished. Tighten the stitch up lightly as needed by pulling on the thread you have in your left hand. We've updated our Privacy Policy, which will go in to effect on September 1, 2022. My husband loves these bracelets, but breaks them regularly, and I've learned to make them STRONG! This might seem like a tough problem, but it's an easy fix. Pick up one bead of color B, and slide it down the thread. Use your fingers to hold the bead in place while you pull the thread taut.
  straws Now your bracelet is ready to wear. Cut the leather cord with your side cutters. Try to keep the stitches uniform in tightness We will show you how to make wrap bracelets with illustrated tutorial that you can download. Round nose pliers, flat nose pliers and wire cutters. This image may not be used by other entities without the express written consent of wikiHow, Inc.
\n<\/p>
\n<\/p><\/div>"}, {"smallUrl":"https:\/\/www.wikihow.com\/images\/thumb\/0\/01\/Make-Wrap-Bracelets-Step-21.jpg\/v4-460px-Make-Wrap-Bracelets-Step-21.jpg","bigUrl":"\/images\/thumb\/0\/01\/Make-Wrap-Bracelets-Step-21.jpg\/aid10602483-v4-728px-Make-Wrap-Bracelets-Step-21.jpg","smallWidth":460,"smallHeight":259,"bigWidth":728,"bigHeight":410,"licensing":"
\u00a9 2022 wikiHow, Inc. All rights reserved. Hi Jaclen! Did you make this project? Enjoy! Keep a paper towel near your workspace, and wipe the opening of the little 2 inch bottle of glue every time you use it, then put the cap back on. As you need more thread, let it flow through your fingers. knot square bracelets diy stitch bracelet cobra stackable knots easy macrame friendship string adjustable instructions bead tutorial cord thread use Shop for the best price. friendship wrap bracelet diy bracelets visit I will give this a try myself with semi-precious stones and beads, see what happens. Then tie a looped knot with the cord ends as close to the last bead as you can, making sure that the bead is still sitting nicely in between the cords. This creates the clasp for your button. You have to admit, they do look like teeth. With Czech SuperDuo seed beads, you will be layering the bead holes to create a layer sequence. I am blind so please give a detailed answer.  Button findings: which will act as your clasp. Last Updated: August 10, 2021 thesprucecrafts Thank you for the clear instructions and great photos! I always wax my cord with beeswax. Measure your button so it fits in the hole, and leave two pieces of short leather after the last knot, cutting the ends at an angle. Thank you SO much for posting this!!! Repeat step 3 by continuing to thread on beads, laying them in the middle of the cords each time until your bracelet reaches its desired length. What is the reason for this? This is truly valuable information for me. I've done beadwork all my life and have made assorted bracelets and other projects but I haven't done any quite like this. This tutorial uses 4mm faceted Czech fire-polished glass beads and 3mm magatama beads, but you can substitute any beads that stack to a similar size. As you go along, I found the tightness of the two sides of cord would become uneven, causing it to bend. Needles: It makes your life easier and the projects will go faster, but you can also put Super New Glue on the ends of thread, hang it over something until it's dry, and use it like a needle. Measure that distance, double it, and add around 4' extra for the loops at the end. It has endless combinations by changing the color of the leather cord, varying the number of times it wraps around the wrist, and, of course, adjusting the types and sizes of the beads. Thanks again! Think about using a different thread color than your leather cord color for a mix of colors. Beading needle: traditional or a separated eye style depending on the thickness of your nylon thread and size of beads. I really appreciate that!~Jaclen, Thanks so much JeanB77 - Info that helps everyone needs to be shared! Gather the ends you just snipped off and the new ends together as 1 thread and tie an overhand knot. There's a button site I love. I'd like to pick your brain for a minute if you don't mind. This is a simple one-wrap bracelet. You need a button on the other end secured with either wire or leather. cord leather bracelet crafts bracelets easy friendship quick diy jewelry making simple craft mens
  Turn the beadwork over again, and pass back through the bead on that side. You can attach a larger closed jump ring to the end and tie on a piece of leather to that, then make a button hole out of it. 6 years ago The wikiHow Video Team also followed the article's instructions and verified that they work. My "micro business" is VeRajArt, and if you'd be willing to remain in touch through email, mine is the same, at gmail. Otherwise, it'll glue itself shut. on Introduction, i make one still need a little work on it but its my first time thank you. Pick up one bead onto your needle and lay it neatly in the middle of the cords. friendship bracelet wrap rope jewelry clasps tutorial hair wrapping bracelets diy embroidery Beading is great fun, better than therapy, and shouldn't be frustrating! What will you try? bracelets friendship bracelet tutorial wrap hippie easy string diy patterns colors braided bohemian cool fun jewelry crochet bracel hair yarn If you run out of beading cord, leave a long tail and tie a knot, then tie a new piece of cord to the left leather cord as you did at the beginning of the project. This design looks great as a single wrap, or make it extra long and wrap it around your wrist twice or three times! twine bracelet upcycle wrapped take create Seems my whole life I've made bracelets of some sort for my friends! Using the button as a measuring guide, form a second overhand knot. And turn it back over to pass through the bead one last time. 2 wraps for an 8.5 bracelet: (8.5 x2) x 2 wraps = 34+ 12 = 46 needed. Aim to keep the space between the knots slightly longer than the diameter of the button. Similar bracelets I've seen use smaller beads than this, closer to 3mm. You can switch up the technique a bit by threading the needle through a bead and under the right cord first, then holding the bead in place as you pull the needle and beading cord all the way through. wikiHow's Content Management Team carefully monitors the work from our editorial staff to ensure that each article is backed by trusted research and meets our high quality standards. Repeat! Beads: use your preference of beads or seed beads. Leather cord and coordinating silk beading cord are available in a wide variety of colors, shapes, finishes, and sizes. Thread the cord up through one hole in your metal button and down through the other. To do so, turn over the beadwork, and pass the needle back through the last bead you stitched. Until I saw the price tag ($200+)! It will save you tearing your hair out if the thread starts to fray.
 Wow yes, thank you so much Jacien for this useful information! My wo. How to hold leather strands: An alternative to holding the leather strands, for stability when adding beads, is to clamp the button to a clipboard. Whatever you make, you need to know what tools to use, because it makes it so much easier!
 Then just knot your leather, measure a button hole, and add another knot at the end. We'll weave in the loose ends later on. wikiHow, Inc. is the copyright holder of this image under U.S. and international copyright laws. the reason Chan Luu is so expensive, they use semi-precious stones and gold/sterling silver plated beads. This article was co-authored by wikiHow Staff.
  Beading needles are especially long, flexible, and have large eyes to easily accommodate the beading cord. It usually takes 24 hrs for the glue to cure, and then you can wear it.You can add a leather buttonhole and button to any kind of bracelet you want, as long as there's some kind of link on the end to tie the leather to! And wow! Click HEREto View and Download an illustratedPDF tutorial, Click HERE to View and Download the SuperDuo bead wrap braceletPDF tutorial. I found that four wraps on my wrist perfectly matched three wraps on my ankle, whereas five wraps on my wrist didn't work as an anklet. The second bead goes on just like the first! If the stud won't fit through the slit, make it bigger. About: Former long time designer at Instructables. Your instructions are very clear! I will teach this to my mini me Grand daughter lol!!! Use your pointer finger to hold the thread up away from the knot to create the tension. Then, turn over the beadwork so it's right side up, and pass back through the bead on top of the leather cords. Do this for the first few beads that you stitch, so your beadwork begins relatively close to the button. She has written seven books on jewelry-making and crafting, including "Teach Yourself Visually Jewelry Making & Beading.". Once you're happy with the length, weave in the final thread tails like you did each time you started a new thread. Christmas is coming lol!!! You can Google everything to find where to buy it. Thanks! Snug the two beads up close to one another and adjust the cord loops as needed to pull tight. We used a bead storage box and placed the button underneath, then taped the ends of the cord to the table to keep both cords nice and tight. (well, that and motivation! on Step 4, 7 years ago I hope these instructions are clear enough to follow.Thanks so much for your question, and good luck with that. Both work great! Did you make this project? In total I've published hundreds of tutorials about everything from microcontrollers to knitting. The last step is to knot your cord. This is the most venerable part of the bracelet in terms of wear and tear, so start your first bead a short distance away from the button to reduce friction. Use the same technique to string and stitch one bead of color C. Stitch another set of one color A, one color B, and one color C. Then, stitch a group of three magatama beads (color D) as if they were a single bead. This could be done with beautiful gem stones or art bead and be really fabulous! Click HERE to View and Download the SuperDuo bead wrap braceletPDF tutorial and to download illustrated pdf tutorial. Your email address will not be published. Make sure the button is centered on the cord. But we all screw up a few times! You can find out more and change our default settings with Cookies Settings. They are inexpensive. You can snug up your beading cord by using your needle to catch each loop and pull the string tight, starting at the earlier beads and working your way down. Share it with us! To make it more professional looking, you can also undo the knot on the first button hole and make one knot with the new piece, joining the two, so it looks like you intended to have two button holes, and it doesn't look like an extra piece was added on. wire name bracelet personalized string bracelets revisit later favorites Thanks. Make sure the knot is tight enough so that it wont slide around. pura fabjewelry I hope you enjoyed this free tutorial on how to make a DIY leather wrap bracelet. You have to order it. wikiHow is where trusted research and expert knowledge come together. Such a detail instructables with clear instructions, good writing and nice pictures. Knotting Cord: If it's going to be one of your favorite bracelets or you know someone will wear it a lot, do 4 layers of thin wrapping thread per side, or whatever will fit through your beads. References Keep in mind, these total numbers are approximate. Or when you have reached your desired bracelet length, lay the bracelet down and run your hand across your bracelet. Then attach one end to your tassel and the other end to the wrap bracelet wherever youd like it to be! Wow! Are my beads too close to each other?
  Thank you very much. Once youve finished wrapping your beads onto the cords, tie a secure knot onto one of the cords next to the last bead youve wrapped on. Our trained team of editors and researchers validate articles for accuracy and comprehensiveness. You will need to keep testing the length of the bracelet after a while to make sure you wrap enough beads onto the cords! Cookies collect information about your preferences and your device and are used to make the site work as you expect it to, to understand how you interact with the site, and to show advertisements that are targeted to your interests. (I think the one for this week is off findings and thread/cord, so I'm trying to figure out what I need, fast!) You can do this by using a clipboard, if you have one. I made a leather necklace too short once and I didn't want to undo all my work either. Your email address will not be published. All you need for this bracelet is: : ) Ok, I can be obsessive, but I love, love, making jewelry! Make the loop directly across from the knot you made when tying on the thread. I'm a New York City motorcyclist and unrepentant dog mom. Pass back through the beads, and slowly pull the thread taut again. There are advantages to both! Then thread the needle underneath the right leather cord, and pull the cord to the right side of the work while keeping the bead between the two leather cords. I have used round recycled glass beads (as found on Lima Beads) and also plan on using some Czech glass like those featured in this instructable. Over and down through the bead. If you want to, you can cover this thread up with another jump ring, like we have in this tutorial. The main part of the double wrap bracelet is now complete and you can wear it like this or you can follow the next couple of steps to make a tassel! It will last quite a while, but I use it often so I buy them 2 at a time. Wrap bracelets like this one are right on trend for spring/summer and can be worn with either casual or dressy outfits.
 I designed and built a house onceMy husband threatened to take my Home Depot credit card away because the deck was growing into the next neighborhood! Check the fit with your button before pulling the second knot as tight as possible. Button Ends will work well, also. Every kind of thread will fit, and it's easy to double. This Instructable guides you through the steps to create a beaded wrap bracelet. Thread your brass button onto the cord and make sure it sits nicely at the halfway point, so you have the same amount of cord either side of the button. This article will explain step by step, complete with photos, exactly how to make a beautiful boho / gypsy style leather double wrap bracelet. I hope this helps a lot of you!
  I am also looking for instructions to make knotted leather bracelets. Wrap bracelets are a must-have for 2016. Genuine leather or faux leather?
- Absolute New York Icon Eyeshadow Palette Exposed
- Mini Beaded Flap Square Bag,
- Rentals That Accept Section 8
- Closetmaid Accessories Home Depot
- Monogram Cufflinks Silver
- Small Flat Concealer Brush
- Ikea Acacia Table, Outdoor
- Plastic Canvas Books For Beginners
- Granular Mole Repellent
- Osprey Archeon 45 Women's
- Tv Entertainment Wall Unit With Fireplace
- Quartzite Slabs Anaheim
- Carr's Cream Crackers
- Candy Heaven Is Here Bandcamp
- Is Highland House Furniture Expensive
- Swiffer Dusting Cloths
- Tumi Alpha Slim Single Billfold
how to make a wrap bracelet with string
Yorum yapabilmek için townhomes for sale melbourne, fl.
how to make a wrap bracelet with string