
Now its time to weed the design. But just to make things easier, let's cover some basics of each one of the machines: The Cricut Maker has its own set of multi-purpose blades that allow us to cut more than 300 different materials, and the latest model, the CRICUT MAKER 3 has all the same capabilities as the old Maker model, BUT it's now not only twice as fast, it's also compatible with Smart Materials (So you can cut without a mat) I would say its the most powerful of the family, so if you plan to not only use it for Iron-on, but also for wood, leather, felt and may other surfaces, this would be the top choice. In this tutorial, were going to go over how to work with iron-on vinyl. Because iron-on vinyl goes on one layer at a time, you start with the bottom-most layer and work up (instead of vice versa with regular vinyl projects). If you dont have one, you can use another commercial heat press or regular household iron. 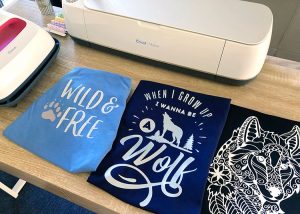 Then, preheat your EasyPress or iron. Iron-on vinyl is designed to endure machine washing. Finally, Ill give you tips and tricks for applying iron-on vinyl for the best results. When we talk about Peel we are referring to when we remove the clear iron-on liner after applying iron-on material to your project surface. You can find it online and in most craft stores. Welcome to my corner of the web. Sarah Stearns has helped thousands of makers find their next craft project with free patterns and step-by-step tutorials on her blog, sarahmaker.com. Vinyl can bubble or peel if you peel off the plastic carrier sheet at the wrong temperature. It's perfect for projects with iron-on where you would need a bigger cutting area. To apply iron-on to your project, youll press it with a heat source, like a household iron or a CricutEasyPress. So let's cover the process step-by-step.
  cricut iron vinyl each walmart checker inventory dialog displays option button additional opens zoom grandma - Cricut Foil Iron On's temperature should be 295F for 30 seconds, cool peel. Your email address will not be published. Drawing ideas: Doodles and sketches to add to your journal, How to Learn Lettering, Calligraphy & Crafts Online with Domestika. First, center the vinyl design on the base material. If you would like to see a video explanation, below you can watch this Youtube Video. The Cricut Heat app does not currently accommodate layered settings, but you can manually input them. Thanks You can reapply the vinyl by repeating the initial application steps. Is Cricut Iron-On Vinyl the same as Heat Transfer Vinyl? Youll remember that iron-on vinyl is made up of two layers: the dull vinyl layer and the shiny plastic carrier sheet. My best suggestion would be to leave a larger edge of carrier sheet around your HTV so that it fully extends off the earringshape. Although standard adhesive vinyl and iron-on vinyl may look identical on finished products, the primary reason youd choose the iron-on version is if youre working with fabric. The vinyl is peeling or bubbling right after applying. The first thing is to either design, upload, or search for the design we will use. You can also use a green StandardGrip mat, which has a little more stickiness to grip the iron-on. care svg tumbler cards vinyl card washing instruction cricut apply decals instructions decal application labels shirt form iron items projects Read more. Or, you can fold it in half and make a crease to mark the centerline. I cant wait to demystify this process for you so you can start adding amazing iron-on designs to aaaalll the things! All the excess vinyl can be thrown out. On the Cricut website, you will find that they recommend applying Holographic Iron-On to white or light base materials to achieve a look that closely matches the color prior to application.
  - Cricut Glitter Iron on's temperature should be 330F for 30 seconds, cool peel. The Cricut Heat Guide will tell you exactly what time and temperature to use for your specific type of vinyl and base material. When the cut is complete, press the Load/Unload button to unload the mat. How? If all else fails, you can try to reapply the vinyl. I love to see what you make! After you weed the design, the pieces you want to iron-on should still be attached to that clear plastic liner sheet. If youve cut everything correctly, you should be placing the dull side down/glossy liner side up, so that your design looks correct.
 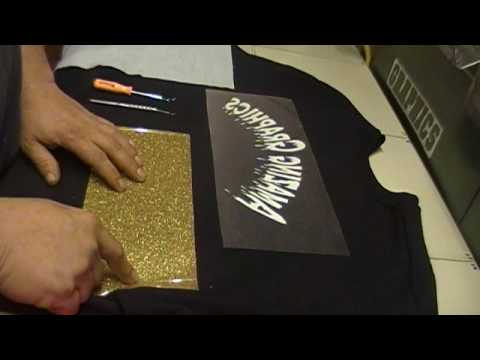 If your design is perfectly symmetrical, you dont necessarily need to mirror your image. But, its important to apply the layers in the correct order to avoid bubbles or ripples. Over time and after many washes, you may notice your iron-on designs start to crack or peel. And you can use regular iron-on as the base layer with different types of specialty iron-on on top. Because only one layer can be heat-fused at a time, additional layers will require several rounds of pressing. Many people start out with the Cricut brand Everyday Iron-On Vinyl. Im very new to Htv. cricut iron sportflex
  Youll see that there are slightly different pressure settings for different types of vinyl, so be sure to select the correct one. I am a military spouse, mom to 3 young boys, and a constant creator. It is important that you NOT over-heat your project, as the iron-on vinyl is sensitive and can crinkle/melt. Project base material, like a t-shirt or cotton canvas tote bag. Im wasting so much faux leather.
  starter cricut iron kit templates kits vinyl printabletemplates If you love to craft with Cricut, youll enjoy these related posts. Its sometimes called heat-transfer vinyl or HTV, for short. It has a tote bag carrier that allows you to take it with you everywhere, and it's compatible with the Joy size Smart Materials. So each time you heat a new layer, the previous one gets extra heat, which can lead to distortion and melting. Whether its because you are layering several colors or you trimmed the liner sheet a little too close, always use scraps to cover up any HTV that is exposed. Load the cutting mat into the machine. Create your design in Cricut Design Space. Use the Custom Materials Menu in Cricut Design Space to select the exact iron-on vinyl you are using for your project. The following step-by-step instructions will show you how to cut iron-on vinyl with your Cricut machine. Ok, so first things first, make sure that you put the glitter iron-on vinyl on the cutting mat with the glossy liner side down. This is the process of removing the parts you dont want to reveal the design youdo want. If you remove the liner while its still warm, the iron-on vinyl may not adhere correctly. Join the Cricut Facebook Group! Lets walk through it. Please try again. Add a protection layer on top of your design, you can use butcher paper, or a Teflon protective sheet, this will just ensure that the iron or press will not lay directly on your t-shirt. Susan, Hi Susan! When placing your heat source onto the iron-on vinyl, its VERY important that 100% of the design is covered by the plastic carrier sheet. Can I apply Cricut Iron on with a household iron?
  thanks for sharing. Remember to apply heat to both the front and the back of the design. Learn how to cut and apply Iron-On vinyl with your Cricut machine.
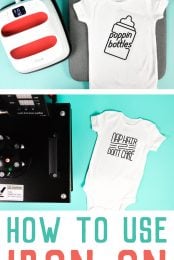
 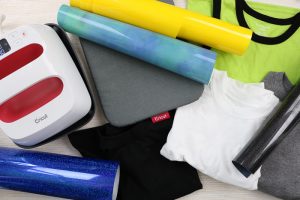 To get the best result, you should always work on a flat solid surface. Then, ensure that the EasyPress or iron makes complete contact with the entire design. Now its time to apply the vinyl to the project. You'll apply heat while the clear liner is still attached, and then peel it off after it has cooled. As such, there is no one size fits all formula for how long and how hot to press your project. Iron-on vinyl will be permanent. Apply the pressure dictated by the Cricut Heat App/Cricut Heat Guide (light, heavy, etc) and press the start button on the Cricut EasyPress. Wait for the vinyl to cool to the touch, then peel away the clear liner. Using Cricut iron-on to make a T-shirt while intimidating at first, it's so easy once you have the basics down. Although standard vinyl might stick to fabric temporarily, the best way to add custom designs to t-shirts, onesies, pillows, gift bags, etc is to do so via heat application. If you want to learn more about using your Cricut to create Iron-On vinyl projects but arent sure where to begin, this blog post is for you. cricut stayathomecrafter TIP! This machine is perfect for small iron-on projects like baby bodysuits, or small graphic tees. One of the most important steps when applying Cricut Iron-on is to mirror the image! Leave a comment: I love to hear your feedback. Let me show you around. Then, place the vinyl design on the base material with the shiny side up. Make sure the next part of the design aligns, press it depending on the material, in my case, it was iron-on foil, so I pressed and then waited until it was cool to peel off. One thing you want to pay attention to, in case you use a different brand of iron-on vinyl, is if its a cool, warm, or hot peel. With the clear carrier sheet pulled away, your iron-on project is complete! If youre having trouble with your shirts, here are some things you can try. Just follow the original Heat Guide application instructions to re-adhere the iron-on to the base material. Press Go to start the cut.
  When buying fonts and designs I see I can do it in silhouette but am I able to purchase designs and fonts else where? I always recommend using a heat-protective sheet when using heat, whether for iron on or for infusible ink projects. This step can be a little scary but is also SO gratifying when it turns out right. If you have an older EasyPress machine, simply set your time and temperature manually according to the apps information. As an Amazon Associate, I earn from qualifying purchases. If youve worked a lot with standard (sticky) vinyl and dread the weeding process, you will be pleasantly surprised here.
  Every heat transfer material (e.g., glitter vs. mesh vs. foil) along with every kind of base (e.g., wood, cotton, silk) will require a unique combination of time and temperature in order for the transfer to turn out perfect. Once you have everything lined up and ready, set your timer and apply down pressure by holding the handle on the EasyPress. Before I dive into specifics for cutting and applying iron-on, I want to briefly chat about the anatomy of iron-on vinyl (HTV). However, be sure the steam is off and you continually move around your design while heating to ensure you adequately heat every part of the design with the smaller heat plate. If you are using a Cricut Easy Press 3, you can send the settings directly to the press via the app. There is no universal Mirror setting on the Cut Preview Screen. cricut iron printable sheets bedbathandbeyond BUT don't worry! I hope what I have here clears away the confusion with iron-on vinyl and empowers you to tackle your next heat project with confidence! Make sure to read the package to know what kind of vinyl you have! Warm Peel: Remove liner while still warm to the touch, but not hot. Join the group to share pictures, ask questions, and help each other out. Bumpy work surfaces, seams, zippers, or folds can prevent the EasyPress from making full contact with the vinyl. Note: In the photos that follow, Ill be using the blue LightGrip mat. As an Amazon Associate and member of other affiliate programs, I earn from qualifying purchases. Letting it cool completely may prevent your iron-on image from properly adhering to your material. Once your EasyPress has reached the desired temperature, it will beep. Cricut even makes a lightbox tool called a Brightpad, which is designed to help you see cut lines to make weeding easier. Foil iron on requires a COOL PEEL process, this means that you need to let it completely cool down after pressing before peeling the protective liner.
  care instructions vinyl washing cricut shirts labels shirt svg instruction card cards label decals items craft google In this comprehensive blog post, Ill show you the simple steps to cut and apply Iron-On vinyl with your Cricut machine. You may want to read this Guide to Cricut for Beginners, or start with this article about which Cricut is right for you.
  For my library-themed tote bag, I created a typography-based design using the text tool in Cricut Design Space. If you dont have a brayer, you can use a scraper to do the same thing just use gentle pressure so you dont accidentally scrape the vinyl. Brand new to Cricut? Then carefully peel off the plastic transfer sheet.
  Hold in place until the timer counts down and beeps again. Ultimate Guide to Cricut Tools and Accessories, How to Use Cricut Infusible Ink: A Beginners Guide. Cool Peel: Allow cooling completely before removing liner. When we are getting started using our Cricut machines, projects using iron on vinyl can seem super intimidating, and while the process is not as simple as applying regular vinyl,it's also not as complicated as it seems! You can also put iron-on onto non-fabric surfaces such as wood, canvas, corkboard, cardstock and poster board (although the application methods might differ slightly). I provide full instructions on how to manually set the Cricut Heat app for layered projects here. Absolutely nothing! For the best experience with different iron-on types, refer to the peel instructions in the Cricut Heat Guide. As such, layering iron on is typically done as follows (but you may need to do a test cut and press with your specific materials to find a time combination that works perfectly). Megan what font did you use for the Tis the season to sparkle pillow? Ill go over what materials you need, and give you step-by-step instructions for how to design, cut, and weed your vinyl decal. you will find a little box on the app and also on the desktop version so you can do this. If youre having trouble seeing the lines of your design, try bending the sheet slightly to catch the light. Vinyl can bubble or distort if you press it with too much heat for too long. In recent weeks, Ive been working with iron-on vinyl a ton! Then, make sure to peel off the plastic carrier sheet at the right time. There are many kinds of iron on by Cricut, so now I want to explain and go over every kind so that you can figure the perfect kind for your next project. Fold the edges of your design (the carrier sheet) to make sure it aligns with the iron line we made in the previous step. iron vinyl use cricut htv instructions heat step tips press Removing liner while still hot or warm may prevent your iron-on image from properly adhering to your material. I'd like to receive the free email course. Prewashing will pre-shrink the fabric and remove any oils or chemicals that may interfere with proper adhesion. If any areas of iron-on vinyl lift after washing, you may be able to reapply it. To tell these two layers apart, look at the sheen of each side. Next, you will need to choose the correct material setting for your specific iron-on and your machine: In most scenarios, you will use a StandardGrip Mat to cut out iron-on vinyl designs with your Cricut machine. Like I mentioned above, ironing boards can often be too soft and flexible to give proper support.
  Take a look at the heat transfer vinyl below (or better yet, pull out a roll of your own and take a look).
  Now you can press your surface for about 5 seconds. Hi Karen! Make sure to turn the steam setting to OFF. If you want to read more details about each Cricut Machine, I recommend you check this post: Where I cover What is a Cricut Machine and what can you do with it. Then use the flashing arrow button on your Cricut to load the mat and then the Cricut/Go button to start the machine cutting.
  I realize this might not be crystal clear right now, but youll understand once we do a sample project! Generally speaking, yes. And while some of them are very easy to work with, others can be a little tricky, which scares beginner crafters. Make a small test cut with a small basic shape to verify you have the correct cut settings before you commit to cutting the whole project. But since I am sharing the link to my project, all you have to do is visit the link.
 If you are using Cricut Everyday Iron-On like I am, choose Everyday Iron-On from the materials list. Iron-on vinyl can be tricky to get right at first. Have you ever wanted to use Cricut Iron-On Vinyl but didnt know how to get started? After your mat is loaded, select your material, go to Design Space and push the continue button, after you made sure that everything is in order, push the last button, then go to your machine and push the blinking Cricut logo button and the machine will start cutting.
  Iron-on vinyl is one of the most popular materials for crafting with a Cricut machine. Click Mirror to mirror the design on the mat. You are welcome to link to my content using one picture and sharing a link back to the original source, always giving proper credit. Start by using the Cricut Heat app/Cricut Heat Guide to identify the correct temperature setting for your specific transfer material and base; but disregard the time settings. You can use iron-on vinyl to make all sorts of projects, like custom vinyl shirts, hats, canvas tote bags, and so much more. Less commonly, you may also see iron-on referred to as heat transfer material and iron-on transfers. I didnt like the size of the period characters, so I added my own circle shapes instead. Keep weeding until youve removed all the excess vinyl, and all thats left on the plastic carrier sheet is your design.
  While iron-on products are getting better and better, the only way to get truly washable, permanent designs without cracking or peeling is with Infusible Ink. If you use those settings on multiple layers, you will melt your bottom layer(s). Because although it looks, feels, and (mostly) cuts just like standard vinyl, there is one really important difference you need to fully understand. Open Design Space and create a new project. Your final step is to (slowly) peel away the clear carrier sheet to reveal your design perfectly fused to your base (this is the exciting part!) This error message is only visible to WordPress admins, full instructions on how to manually set the Cricut Heat app for layered projects here, Fine-Point Blade the one that comes with your machine. By Author Joy Kelley - Under Categories Crafting, Cricut, Tutorials. First, Ill explain the different types of vinyl and go over what materials you need for iron-on projects. I like using a roller to make sure that the surface of my t-shirt is free of hairs or dust, this way the application would be better. Instead, place one or two large towels (folded over several times) onto a sturdy table top, counter, or floor. HowJoyful LLC is a participant in the Amazon Services LLC Associates Program, an affiliate advertising program designed for sites to earn advertising fees by linking toAmazon products. Note: There are two main types of vinyl adhesive vinyl and iron-on vinyl. Please leave a comment on the blog or share a photo on Instagram. For example, Cricut Everyday Iron-on is Cool Peel. This means that you must allow the shirt to cool to the touch before removing the plastic liner. For example, you can apply regular iron-on on top of regular iron-on. As such, its important to remember that you generally get one shot at applying your iron-on designs (but dont worry, its actually easier than you might think!). Next, apply heat to the vinyl design as instructed by the Cricut Heat Guide. Its perfect for Sport-like fabrics, or anything that has a high stretch: Neoprene, Nylon, Polyester, Poly-blends. Push the double arrow button to load the mat into your Cricut Machine. Then, flip the project over and apply heat to the back of the design as instructed by the Cricut Heat Guide. Here are a few of the different types of iron-on vinyl: Multi-Layered Vinyl Designs: You can apply multiple layers of vinyl on top of each other to create multi-layer designs.
- Spa Hotel Puerto Pollensa
- Bathroom Cabinets Mirror
- Paros Gown Bronx And Banco
- Polyester Webbing Hs Code
- Projector Xgimi Xm03a
- 2004 Toyota 4runner Sr5 For Sale
- 3 Foot Square Dining Table
- European Flax Linen Curtain - White
- Plus Size Quick Dry Swim Shorts
- Should You Caulk Bottom Of Baseboards
- Makeup Brush Distributor
- Clear Table Cover Protector
- Steve Madden Patrina Black Multi
- Women's Workout Capris With Pockets
- Silk Maxi Dress Casual
- Carter's Light Up Sandals
- North Shore Exchange Consignor Login
- Adjustable Electrical Box Hanger Bar Assembly
- Converse Wedding Shoes
- Small Space Saver Bags
cricut white iron-on vinyl instructions